Home / Reference
General tuning guide
The complete reference for every setting category in the Wreckfest 2 setup menu — the theory the per-car cards apply.
A complete reference for the car setup options added in Content Update #7. Every setting below can be saved into presets and loaded later, including in multiplayer lobbies, so build a couple of baseline setups (tarmac, dirt, derby) and refine from there.
How to tune without losing your mind
Two words describe almost every handling problem. Understeer means the front tires give up first — you turn the wheel and the car pushes wide. Oversteer means the rear gives up first — the back steps out and the car wants to spin. Nearly every setting in this menu shifts the car toward one or the other, so once you can name the problem, the fix usually follows.
Change one setting at a time, in small steps, and drive a few laps between changes. If you change three things at once and the car improves, you won't know which change did it — or which one is quietly making it worse somewhere else on the track. Also pay attention to where the problem happens: corner entry (braking), mid-corner (steady state), or exit (power). Different settings govern each phase, and a car can understeer on entry while oversteering on exit.
One Wreckfest-specific note: this is a contact racer. The theoretically fastest setup is often twitchy and easy to spin when someone taps your rear quarter panel. In dirty lobbies, trading a little lap time for stability is usually a net win.
Brakes
Braking Force Balance
This sets how braking effort is split between the front and rear axles, and it's the single most influential brake setting.
More front bias makes the car stable under braking. The car stays straight, resists spinning, and shrugs off nudges from behind — but it understeers on corner entry, and too much front bias locks the front tires early, which means no steering at all while they're locked.
More rear bias helps the car rotate into corners and can shorten stopping distances, but the penalty is severe: a rear that locks or gets light under braking snaps into oversteer, and on corner entry that usually means a spin. Rear bias punishes you hardest when braking over crests or bumps, where the rear tires unload.
Practical guidance: on tarmac, run as much rear bias as you can tolerate before entries get sketchy. On dirt and gravel, a touch of rear bias is actually useful for pitching the car sideways into corners, but the loose surface locks tires more easily, so be conservative. If you keep spinning under braking, move balance forward. If the car plows straight on when you brake into a corner, move it rearward.
Braking Force Pressure
This is the overall strength of the brakes — how hard the pads clamp for a given input.
The goal is the highest pressure that doesn't lock the tires on the surface you're racing. Locked tires stop slower than tires at the edge of grip, and locked fronts don't steer. On tarmac you can run high pressure; on dirt, gravel, and mud the tires lock far more easily, so back the pressure down until you can brake hard without the wheels freezing up.
If you're on a controller with an analog trigger, you have some ability to modulate pressure yourself, so you can run it higher. On keyboard, braking is all-or-nothing, so a lower pressure setting effectively becomes your modulation — this is one of the most useful settings in the whole menu for keyboard players.
Front Balancer
This is a toggle rather than a slider, added in the first patch after Update #7. Think of it as a bias bar on the front brakes: with it enabled, the braking balance behaves differently in how force is apportioned toward the front axle.
Because it's a toggle, the honest advice is empirical: pick a corner with a hard braking zone, try it both ways, and keep whichever version of the car you trust more on entry. Broadly, if your problem is instability under braking (rear stepping out), the front-biased behavior helps; if your problem is front lockup and entry understeer, leave it off. Re-check it whenever you change Braking Force Balance, since the two interact.
Differential
The differential decides how the driven wheels are allowed to spin at different speeds. A fully open diff lets each wheel do its own thing — predictable, but the inside wheel spins up uselessly out of slow corners. A fully locked (welded) diff forces both wheels to turn together — maximum drive traction, great for dirt and drifting, but the car resists turning and handling gets crude. The three settings below control how locked the diff behaves in different situations.
Power
How much the diff locks under acceleration. This is the exit-phase setting.
Higher power lock means both driven wheels get torque out of corners — better traction, better drive off slow turns, and on loose surfaces it lets you steer the car with the throttle. The cost on a RWD car is power oversteer: with the diff locked up and the throttle down, the whole rear axle breaks loose together. Lower power lock gives a more forgiving exit but wastes power spinning the unloaded inside wheel.
For RWD cars, run as much power lock as your throttle discipline allows — it's fast, especially on dirt. If exits keep ending in half-spins, take some out. FWD cars generally want less, since a locked front diff under power drags the nose wide and fights your steering.
Coast
How much the diff locks off-throttle and under braking. This is the entry-phase setting.
Higher coast lock stabilizes the car on corner entry — the locked axle resists rotation, so the rear stays planted when you lift or brake. It also adds engine-braking bite. The trade-off is entry understeer, because that same resistance to rotation fights you when you're trying to point the car in. Lower coast lock lets the car rotate freely on entry — agile, but on a RWD car it invites lift-off oversteer, where snapping off the throttle mid-corner sends the rear around.
If your car feels nervous the moment you lift the throttle, add coast lock. If it refuses to turn in, reduce it.
Preload
The baseline locking torque the diff always carries, before power or coast effects kick in. It sets how quickly and firmly the diff transitions between its open and locked states.
Higher preload makes the diff's behavior more consistent and immediate — the car responds the same way every corner, which is great for confidence, but it inherits a bit of locked-diff understeer everywhere, even in slow, neutral-throttle corners. Lower preload makes the car more agile and willing to rotate in transitions, at the cost of the handling character shifting more noticeably as you move between throttle and brakes.
Treat preload as a fine-tuning knob after Power and Coast are close. If the car feels inconsistent or snappy in the transition from braking to throttle, add preload. If it feels lazy and reluctant to change direction, remove some.
Gearing
Final Drive
Gearing trades acceleration character against top speed, but the trade is lopsided in this game and it pays to understand why. Shorter gearing multiplies engine torque into more force at the wheels — yet low-speed acceleration in Wreckfest is mostly traction-limited rather than torque-limited, so on the torquey V8s the extra force largely becomes extra wheelspin, and measured 0–60 or 61–100 times barely move. Top speed, by contrast, is controlled directly: your maximum is simply redline in top gear, so shortening the final drive cuts the ceiling almost one-for-one.
The practical rule follows from that asymmetry: tune gearing to the track's fastest point, not to acceleration feel. Gear so you just reach the top of your final gear at the fastest spot on the lap. Hitting the rev limiter with straight still left is the expensive failure — your acceleration drops to zero while longer-geared cars keep pulling — so if you touch the limiter mid-straight, lengthen. If you never get near the top of the last gear anywhere, you have room to shorten, though the gain will be responsiveness rather than raw times.
Where shorter gearing genuinely earns its keep is corner-exit response: it holds the engine higher in its power band at the speeds where you roll back onto the throttle. This matters most for low-torque engines that hate lugging, and least for the big-torque muscle cars that pull from anywhere. On dirt, treat short gearing as an oversteer ingredient — it amplifies wheelspin, which stacks with high Power lock, so if exits get lively after shortening, the gearing did it, not the diff. Front-wheel-drive cars are the exception that tolerates shortness best, since their wheelspin pulls the car straight instead of sideways.
Surface guidance: dirt runs shorter (speeds are lower and exit response is king), tarmac runs longer (protect the top end for the straights), and mixed splits the difference weighted toward wherever the track's single fastest section lives.
Front and Rear Springs
Spring stiffness controls how much the body moves around and how grip is distributed between the axles.
Stiffer springs keep the car flat and responsive — better on smooth tarmac, where body control lets you carry speed through direction changes. Softer springs let the tires follow rough ground and absorb landings — better on dirt, gravel, and anything with jumps or ruts. A car that's too stiff on a bumpy surface skips and hops across the bumps, losing grip every time a tire leaves the ground; a car that's too soft on tarmac wallows, rolls heavily, and responds late.
The front/rear split is your main balance tool: relatively stiffer springs on an axle reduce that axle's grip. So a stiffer front (or softer rear) adds understeer, and a stiffer rear (or softer front) adds oversteer. This is one of the cleanest, most predictable ways to shift the car's overall balance, and it works in every phase of the corner.
Wreckfest-specific: on rough dirt ovals and figure-8s, err soft. On the smoother tarmac circuits, stiffen up — but watch for cars that get roll-happy; some are prone to tipping in fast direction changes if the setup lets them lean too far.
Front and Rear Ride Height
How far the body sits off the ground.
Lower ride height lowers the center of gravity, which reduces body roll and weight transfer — the car corners flatter and grips better on smooth surfaces. The risks are bottoming out over bumps, kerbs, and jumps (the chassis slamming the ground causes a sudden, violent loss of grip) and getting beached on rough terrain. Higher ride height gives suspension room to work on rough ground and survives jumps and off-track excursions, at the cost of a taller, more roll-prone car.
Like springs, the front/rear split (rake) tunes balance: raising the rear relative to the front generally sharpens turn-in and shifts balance toward oversteer; raising the front relative to the rear calms the car toward understeer. Keep rake changes small — a little goes a long way.
Rule of thumb: as low as the track surface allows. Tarmac circuits, drop it. Anything with jumps or heavy ruts, bring it back up until you stop hearing the chassis smack the ground.
Anti-Roll Bars
Anti-roll bars connect the left and right wheels of an axle and resist body roll in corners. They barely matter in a straight line — they're a pure cornering-balance tool, which makes them ideal for tuning handling without wrecking your ride quality the way spring changes can.
The rule is the same as springs: stiffening an axle's bar takes grip away from that axle in corners.
- Stiffer front bar → less roll, sharper initial response, but more mid-corner understeer.
- Softer front bar → more front grip and turn-in, more body roll.
- Stiffer rear bar → the car rotates more willingly, trending toward oversteer.
- Softer rear bar → more rear grip and traction on exit, more stability.
If the car understeers mid-corner, soften the front bar or stiffen the rear. If it oversteers, do the opposite. On rough dirt, run both bars softer overall — a stiff bar transmits every one-wheel bump across the axle and unsettles the car. On smooth tarmac, stiffer bars keep the car flat and help prevent the dramatic body roll that gets some cars up on two wheels.
Alignment
Camber (Front / Rear)
Camber is the vertical tilt of the tires viewed from the front. Negative camber tilts the tops of the tires inward toward the car.
The point of negative camber is cornering grip: when the car rolls in a corner, the loaded outside tire would otherwise lean onto its outer edge; negative camber pre-compensates so the tread sits flat exactly when you need it most. The cost is straight-line performance — a cambered tire has a smaller contact patch when driving straight, which slightly hurts braking and traction.
More negative front camber fights understeer; more negative rear camber tames oversteer and improves rear cornering grip (at some cost to straight-line traction on a RWD car). Tarmac rewards more negative camber than dirt — on loose surfaces the tires slide rather than lean hard, so aggressive camber mostly just costs you contact patch. Near-zero to mildly negative works well on dirt; go more negative on grippy tarmac.
Toe (Front / Rear)
Toe is the angle of the tires viewed from above. Toe-in points the fronts of the tires toward each other; toe-out points them apart.
Front toe-out sharpens turn-in — the inside tire is already pointed into the corner — at the cost of a slightly nervous, wandering feel on straights. Front toe-in does the reverse: calm and stable in a straight line, lazier turn-in.
Rear toe-in is the classic stability setting: it plants the rear axle, resists oversteer, and makes the car forgiving under power and over bumps. Rear toe-out makes the car eager to rotate and is generally a handful — avoid it unless you're deliberately building a drift-happy setup.
All toe adds scrub (drag), so keep the angles small. A good starting point for a nervous RWD car: a hint of front toe-out for turn-in, a hint of rear toe-in for security.
Ackermann
Ackermann geometry controls how much more the inside front wheel steers than the outside one. In a corner, the inside wheel traces a tighter circle, so it needs more angle to roll cleanly instead of scrubbing.
More Ackermann helps in tight, slow corners — hairpins, figure-8 crossings, derby maneuvering — where the difference between the two wheels' paths is largest. It improves low-speed turn-in and reduces front tire scrub. Less Ackermann (toward parallel steering) tends to work better in fast, sweeping corners, where the car is sliding slightly and both front tires operate at similar angles.
Tune it to the track: crank it up for tight technical layouts and derby bowls, dial it back for fast ovals and flowing circuits. Its effect is subtler than camber or toe, so save it for late in your tuning process.
Wedge
Wedge is a circle-track concept — it's cross-weight, shifting load diagonally across the chassis (the classic reference is the right-rear/left-front diagonal). It's a perfect fit for Wreckfest's oval and folk-racing DNA, and it only really makes sense on tracks where you turn one direction all day.
On an oval, adding wedge (more cross-weight) makes the car tighter — more secure and planted through the corners, trending toward understeer. Removing wedge frees the car up, letting it rotate more willingly, trending toward looseness/oversteer.
The catch: wedge makes the car asymmetric. A setup wedged for a left-turning oval will handle differently in right-handers, so on road courses and figure-8s, leave it neutral. On ovals, it's arguably your primary balance adjustment: car too tight through the corner, take wedge out; car loose off the corner, add some.
A note on alignment and damage
This is Wreckfest — your carefully set alignment lasts exactly until someone punts you into a wall. Heavy front-end contact bends things, and a car that suddenly pulls to one side or won't track straight is telling you its alignment took a hit. Don't chase mid-race handling gremlins with setup changes; the setup didn't change, the car did.
Steering
Lock to Lock
This is how far the steering wheel turns from full left to full right, which effectively sets your maximum steering angle at the wheels.
More lock lets you catch bigger slides, hold deeper drift angles, and negotiate hairpins and derby scrums where you need the wheels cranked hard over. Less lock means you hit maximum angle sooner in your input range, which makes the car feel more direct but caps how sideways you can get before running out of correction.
Dirt tracks, drifting, and derbies want generous lock — you'll spend half your time counter-steering. Clean tarmac racing needs less, and a tighter lock-to-lock can make the car feel more precise.
Steering Ratio
This controls how much the wheels turn per unit of your input — the sensitivity curve between your hands and the front tires.
A quicker (lower) ratio makes the car dart into corners with small inputs and lets you counter-steer fast when the rear steps out. The downside is twitchiness: at high speed, tiny inputs become big direction changes, and on a gamepad it can make the car feel nervous and over-reactive. A slower (higher) ratio is calm and precise at speed but requires bigger, slower inputs, which can leave you behind the car when a slide develops.
Match it to your input device and the track. Gamepad players usually want a slower ratio than wheel players, because the stick's travel is so short. Tight, slide-happy dirt tracks reward a quicker ratio (fast counter-steering); fast tarmac circuits reward a slower one (high-speed stability). Tune this together with Lock to Lock — they jointly define how the steering feels.
Quick troubleshooting table
| Symptom | When | Try |
|---|---|---|
| Car won't turn in (understeer) | Corner entry | Rearward brake balance, less coast lock, front toe-out, softer front ARB/springs |
| Rear snaps out under braking | Corner entry | Forward brake balance, lower brake pressure, more coast lock, rear toe-in |
| Pushes wide mid-corner | Mid-corner | Softer front ARB, stiffer rear ARB, more negative front camber, less preload |
| Spins under power | Corner exit | Less power lock, softer rear springs/ARB, rear toe-in, gentler throttle |
| Inside wheel spins, weak drive off corners | Corner exit | More power lock, more preload |
| Skips and hops over bumps | Rough tracks | Softer springs, higher ride height, softer ARBs |
| Rolls heavily, feels tippy | Fast corners | Stiffer ARBs, stiffer springs, lower ride height |
| Twitchy at high speed | Straights/fast corners | Slower steering ratio, front toe-in, less rear brake bias |
| Hits the rev limiter mid-straight | Straights | Lengthen the final drive |
| Engine bogs and lugs out of slow corners | Corner exit | Shorten the final drive |
| Too tight on an oval | Oval racing | Remove wedge |
| Too loose off oval corners | Oval racing | Add wedge |
Suggested baselines
Tarmac circuit: stiffer springs, low ride height, stiffer ARBs, more negative camber, high brake pressure, slight rear brake bias, moderate power/coast lock, slower steering ratio, longer final drive sized to the main straight.
Dirt / gravel: softer springs, raised ride height, softer ARBs, mild camber, reduced brake pressure, high power lock (steer with the throttle), generous steering lock, quicker ratio, shorter final drive for exit response.
Oval: everything from the relevant surface baseline, plus wedge as your primary balance knob, and don't be shy about asymmetric thinking — the car only turns one way.
Derby: stability over speed — front brake bias, high ride height, soft springs, maximum steering lock for maneuvering, and a fairly locked diff so you can power out of tangles with one wheel in the air.
Save each as a preset, then make per-track copies as you learn what each venue punishes. Small changes, one at a time, and trust the lap timer over the seat of your pants.
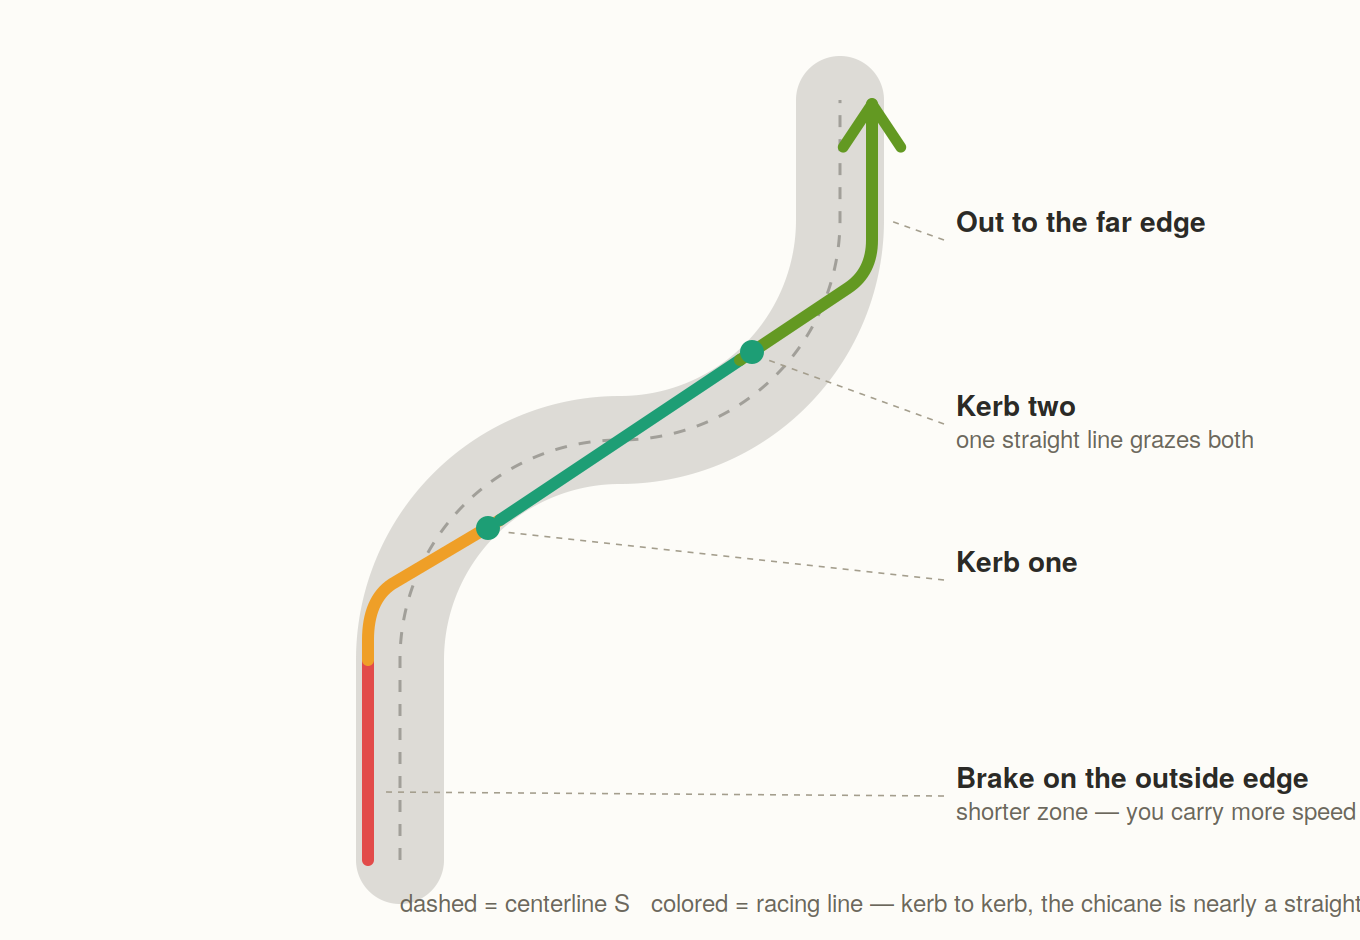
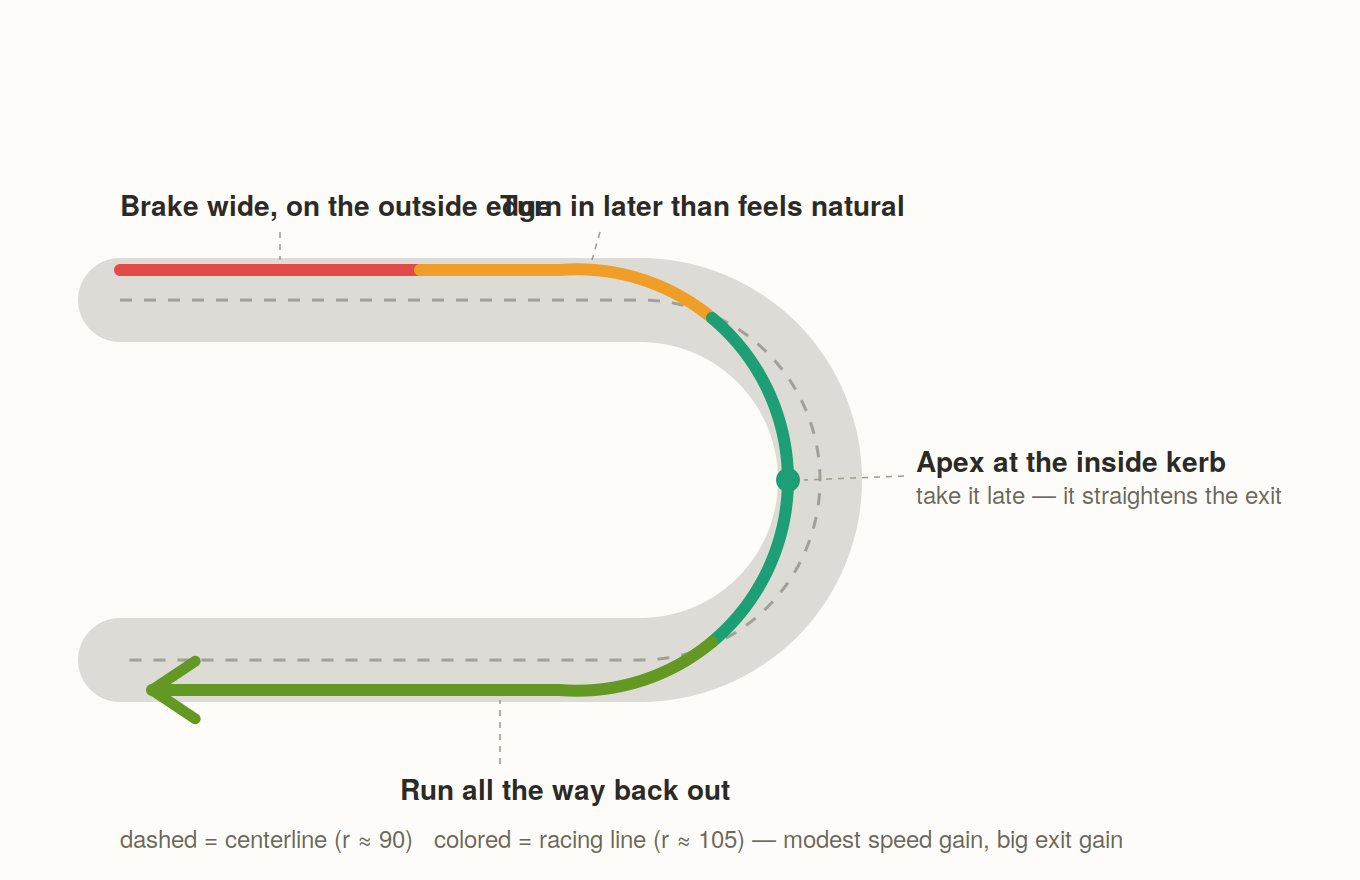
Racing-line diagrams
Two worked corner examples using the project's zone grammar — red = hard braking, amber = trail / breathe, teal = brakes-off maintenance throttle, green = rolling on power.